TheCrabsHomestead

10: School Bus Sticker Removal

Stage 10: Heat It, Scrape It, Sand It, Seal It

This past week, besides finishing the floor prep, we also tackled some of the more tedious, but necessary tasks that we would eventually have to complete. Also, we have had some amazing weather the last few days here in Texas, but it isn’t going to last long:( So we work with the weather since we can’t park the bus under anything.

Removing the reflective tape and lettering….everywhere.

Why? The reflective tape was cracked, so when we repaint it, that will be the first thing to go and chip off. I have to say, 360 degrees was monotonous to the say the least:) But I can find some joy in those types of mindless tasks. Anyway, We started with a sander with wire wheel attachment. It was taking a while to remove the stickers and was really eating through the paint easily as well. Just using the paint scraper on the letters was working ok, but the old, cracked reflective tape was a b****. So, I jumped online to skoolie.net and found a few great solutions.

Paint Scraper with Heat Gun- to start, if this doesn’t work..

Rub Diesel/Paint Thinner on It and let it set for a few minutes..then Wipe It off…Finally..

Sand It All Down

I remembered Crab just received the Heat Gun (Wagner $20 from Amazon) he ordered for a separate Didgeridoo Project we want to tackle:), and grabbed it out of the garage.

Applying the heat gun and scraping the reflective tape at the same time. Remember to wear gloves when scraping, it gets really hot!!
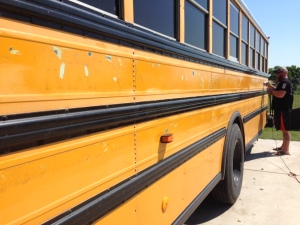
Side by Side of (left of rivets) Crab's Sanding only Side and (right of rivets) the scraper and heat gun side. The heat gun was much more efficient!
Side by Side of (left of rivets) Crab’s Sanding only Side and (right of rivets) the scraper and heat gun side. The heat gun was much more efficient!

We finished one side and the rear of the bus in one afternoon. Although we were able to remove the stickers, the sticky residue was still being a problem. We figured we will try sanding it off when we were done removing the stickers.
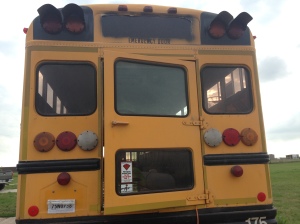
Back of ChittyBang- BEFORE
Back of Chitty Bang: After School Bus Sign, Emergency Door Lettering, and reflective tape all removed via heat gun and paint scraper..and a ladder...and a stepstool...
Back of Chitty Bang: After
School Bus Sign, Emergency Door Lettering, and reflective tape all removed via heat gun and paint scraper..and a ladder…and a stepstool…
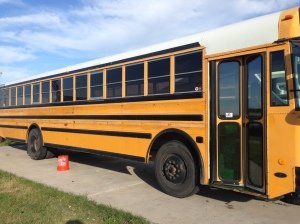
Driver Side BEFORE
Driver Side BEFORE we take off reflective tape. Crab had removed these letters already.
No words, no reflective tape on this side of Chitty Bang. The next day, we tackle the front and other side.
Driver’s Side After No words, no reflective tape on this side of Chitty Bang. Except around the emergency windows and the AMTRAN sticker. Darn It!

Day 2 Sticker/Tape Removal

Moving on over to the passenger side of the bus 🙂

Passenger Side BEFORE
Passenger Side: After Sticker/Tape removal

We are DONE! SIKE!

DAY 3 Sanding/Sealing

Of Course I thought we were completely done with sticker removal, until I glanced out the kitchen window and realized, nope. We forgot the tape around all four emergency exit windows and their letters! So, the next day, I went back up the ladder and finished the job…for real this time!

Of Course I thought we were completely done with sticker removal, until I glanced out the kitchen window and realized, nope. We forgot the tape around all four emergency exit windows and their letters! So, the next day, I went back up the ladder and finished the job...for real this time!
Tape & Sticker Removal Complete. FOR REAL This time!
Crab getting work done:) After removing the stickers we sanded the sticky residue the best we could. It really just smeared it around. But it was smooth!
Crab getting work done:)
After removing the stickers we sanded the sticky residue the best we could. It really just smeared it around. But it was smooth!
Gotta get a side beard pic :)
Gotta get a side beard pic
🙂
Get Work done Son! Crab Sanded the top row, and I would sand the bottom row. Whoever wasn't sanding, was using alcohol to clean the area, and then applying corroseal just to make sure rust wouldn't form between now and the real paint job of Chitty Bang!
Get Work done Son! Crab Sanded the top row, and I would sand the bottom row. Whoever wasn’t sanding, was using alcohol to clean the area, and then applying corroseal just to make sure rust wouldn’t form between now and the real paint job of Chitty Bang!

A couple of hours later…..

Bus is completely Stickerless (made up a word! What up Webster?), Sanded, and Sealed.
FRONT AFTER Chitty Bang Sticker Removal

All in all, I don’t really know if we wasted time by just not sanding first. Maybe we could have if we had a better tool for that job. But I think this process worked for us and the tools we had.

Next up , More Demo and the story of making Chitty Bang Legal!

Stage 11…

or

back to Stage 9

or

Stage 1

or

The Editing Our Life Series

7 responses to “10: School Bus Sticker Removal”

  1. […] Stage 10: Heat It, Scrape It, Sand It, Seal It……could be a new song…:) […]

    Like

  2. You’re lucky to have a mechanic friend. I was thinking the next time we talked that I waned to give you some more free advice as to why you must use additives in today’s diesel and also recommendations on which crankcase additive to use to prolong engine life but likely you already have been guided that way.

    What a daunting task made all the more difficult by keeping a running record. But the pride of ownership is directly proportional to the effort involved. And, oh, remind me to tell you about the use of cayenne pepper to keep rodents out of areas they find attractive, e.g., the fuse box we studied for a moment.

    Liked by 1 person

    1. I def want any knowledge we can get! And yeah, keeping a running record of the project helps to slow
      Me down a little (lol) and allow time to look at all the possibilities. Although I end up giving myself too many choices at times, but none the less, I can feel good about whatever decision we decide on knowing the good, the bad, and the ugly:) def hear from you soon!

      Like

  3. Hello!! I am SO glad that I stumbled into your post! I bought a 1986 Blue Bird just yesterday! I am starting this crazy adventure tomorrow. Your blog is incredibly informative and such a gem. I love it.

    Like

    1. Hi! I’m so glad you are finding it helpful!! You should check out the facebook page Skoolie Converters if you haven’t already. They are all very helpful and a great community! We have learned a lot just in the tear down process..seal everything, don’t use the great stuff foam…lol. We should be starting the build up process soon! And I have some
      Videos I need to edit and post as well. Good luck on your adventure! And thanks for following!

      Like

    2. Oh and check out our other social media links too! We are on Pinterest, Instagram, and facebook!

      Like

  4. WE HAVE THE SAME BUS!!! Genesis and all. 👋🏼

    Like

Leave us a message!

This site uses Akismet to reduce spam. Learn how your comment data is processed.